One of my goals for this year was to start seeds indoors so that I could spend less and get more. That being said, starting seeds and growing seedlings that have a fighting chance of making it does require some initial and ongoing investment.
First up was deciding what kind of set up I wanted to have. My seed starting nursery had to be in my dining room, and I have a cat. Those two facts were considered in my design decision. I know a lot of people buy shelving units for this purpose but it just didn't seem to fit with what I had in mind.
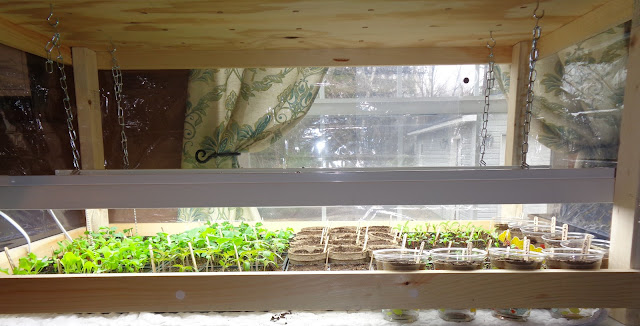
So I asked my husband to build an open sided box with a perforated plywood top that could sit on top of a spare table we already have. The size was determined by what and how much I planned to start from seed.
This is a picture of my husband (the builder) and his assistant (angel kitty) with the finished basic structure
The materials that he used were: 1/4 sheet plywood, 1 (8ft) 2x3 for the legs, 4 (8ft) 1x3, and screws
He drilled holes all over the plywood top for air flow and the bottom board is up a little from the bottom so air can flow under. We purchased clear plastic shower liners and cut them and attached them with velcro circles to the sides. The reason for this was two -fold: the kitty and it is still cold here in Maine in March/April. The liner was easily raised for watering and for additional ventilation.
We hung two 48 inch fluorescent shop lights and we were ready to go!
I had learned from watching a ton of youtube channels that you should dump the potting mix in a tote and wet it until it held together, then spread it into your cell packs and pack it down. Once that was done I got down to the tedious business of planting the seeds.
I used a pencil to make the planting hole and pop sticks to mark them. I also wrote down lots of info in my gardening journal. I planted 24 cells of Roma Tomatoes and I ended up with 22 seedlings!!!
Just in case you are curious this is a list of what I planted:
brocolli, collards, kale, roma tomato, lettuce, arugula, chard, basil, calendula, marigold, zinnia, statice, feverfew, squash, pumpkin, sunflower, zucchini, & cucumber
Everything germinated except for one type of lettuce ( I tried twice so I'm going to e-mail the company). Everything grew and everything is now outside!!!! so exciting!!!
I kept the clear dome lids on until they germinated and then lowered the lights and turned them on. I actually put the lights on a timer to go on at 6 a.m. and off at 10 p.m. The plants thrived!
The cool weather things (greens) were able to go outside in 4 weeks, so that is when I repotted the tomatoes and the basil.
I transplanted all of the greens to a bed with a cover for a few weeks. I planted them close together and now I am in the process of transplanting them around the garden.
I really feel that my first experience with seed starting was a success. I will be able to use the set up we came up with for years. I even have plans to build up onto it and plant more next year!
Here are a few basic things I did (that I learned from others on the internet) that I believe made my endeavor a success:
1. prewater the potting mix--it holds the water better
2. I didn't have heat pads (expensive!) so for the first week I ran my space heater nearby. I think it worked because all of the seeds germinated in under 5 days.
3. once the seeds germinate take the plastic dome off.
4. water seeds with a water bottle on mist and keep moist
5. once sprouted water from the bottom--add water to the tray
6. some algae growth on the soil is normal--increase ventilation and keep the surface of the soil "scratched" I used a plastic fork, so that it doesn't repel water.
**It was easy for me to keep a constant eye on my plants because they were right in my dining room. I recommend that you put your set up where you can pay attention to the seedlings and catch any issues immediately.
**I think my expenses to start these seeds was about $250 including the seeds (I have leftovers to plant directly outside also). Obviously the seeds and the cell packs and potting soil are consumable so will be an expense each year.
**I hope some of this information is helpful to other newbies like me!


No comments:
Post a Comment